Creating a new service
Add a service when you offer something new clients can book. After you save, choose whether to put it on booking availability - saving alone does not make it bookable.
Before you start
- Know the name, description, length, and price clients should see.
- Create any fields or add-ons you want to attach first, or add them later.
- On the Free plan you can have only one service. Upgrade to Solo if you need more. See Good to know.
Start blank or from a template
- Open Appointments → Catalog → Services.
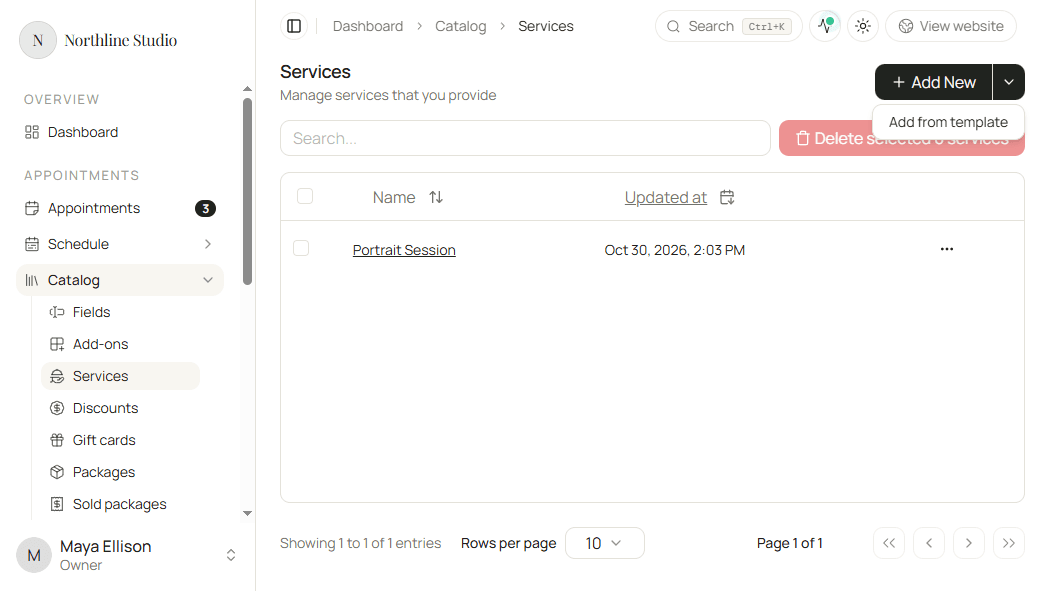
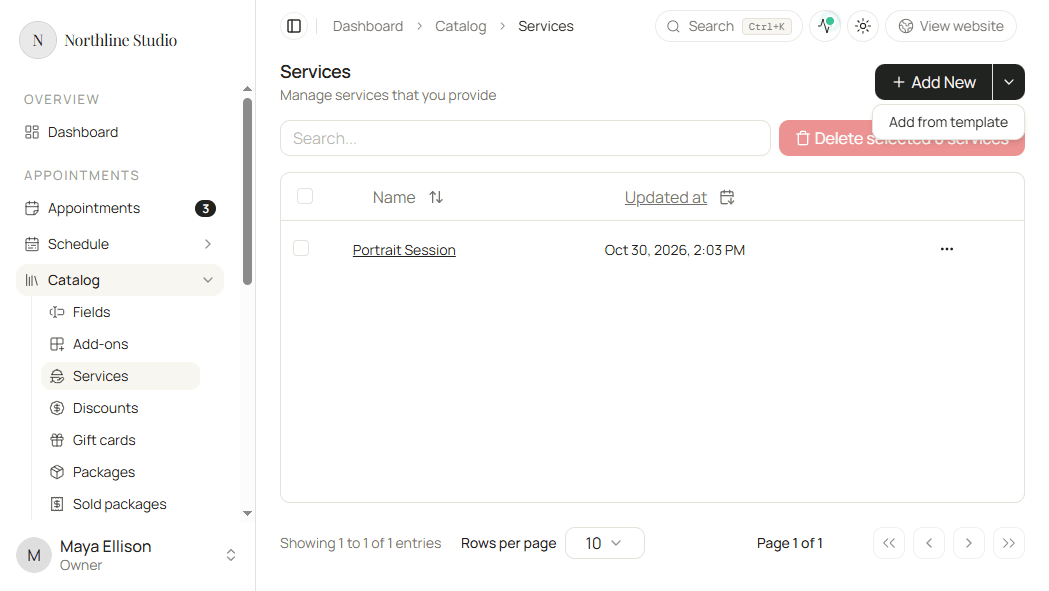
- Click Add New for a blank form, or open the chevron and choose Add from template.
- If you chose a template, pick a profession, pick a service, then click Create.
The New service form opens on the General tab. You can also start from an existing service: open the row menu and choose Clone.
General
Details
- Enter a unique Name.
- Enter a Short description clients see during booking.
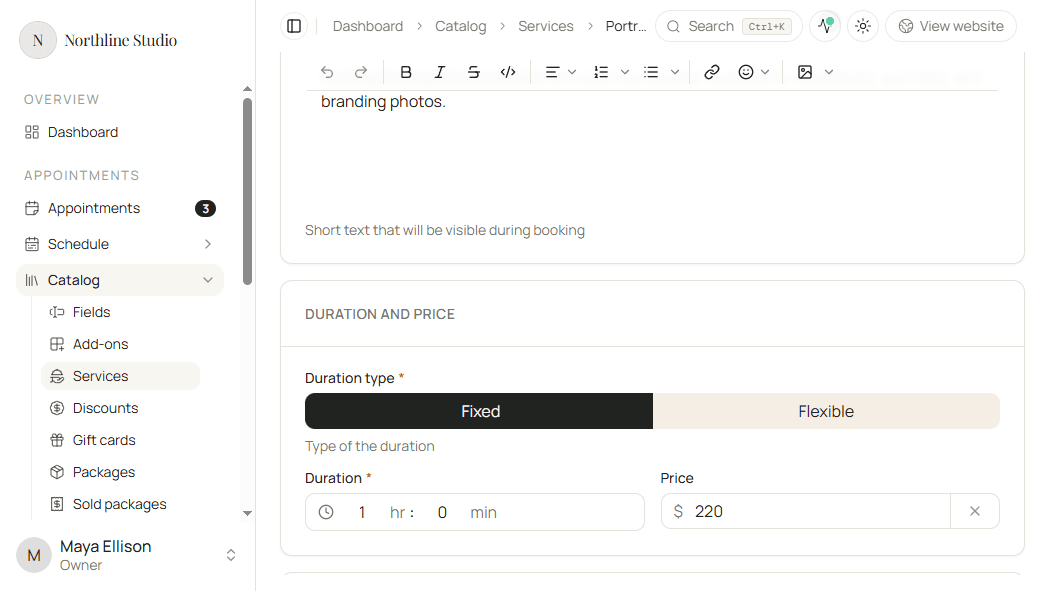
Duration and price - Fixed
- Set Duration type to Fixed for one set length.
- Set Duration in hours and minutes.
- Optionally set Price.
Duration and price - Flexible
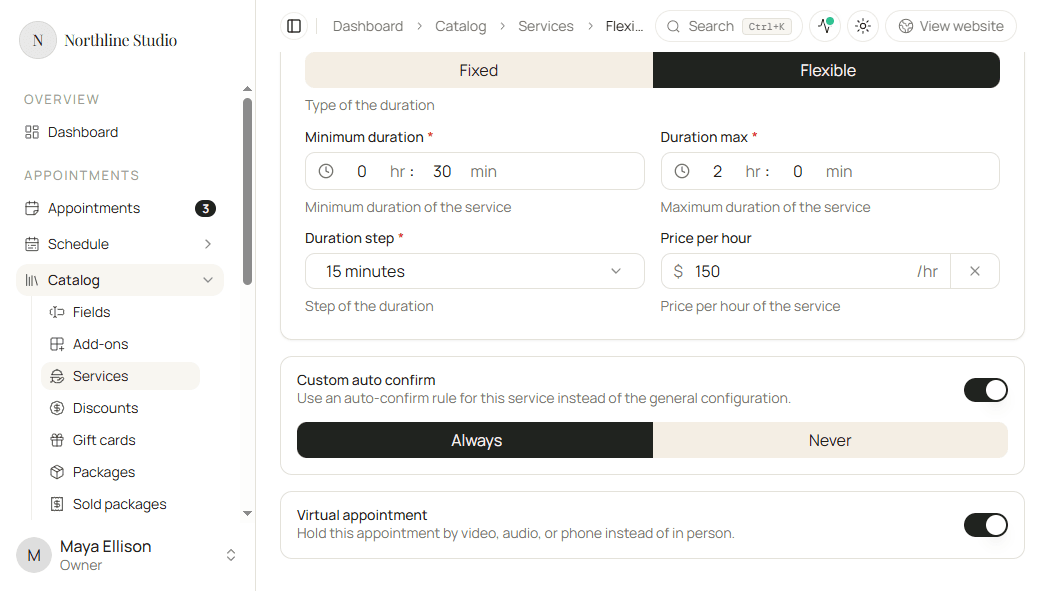
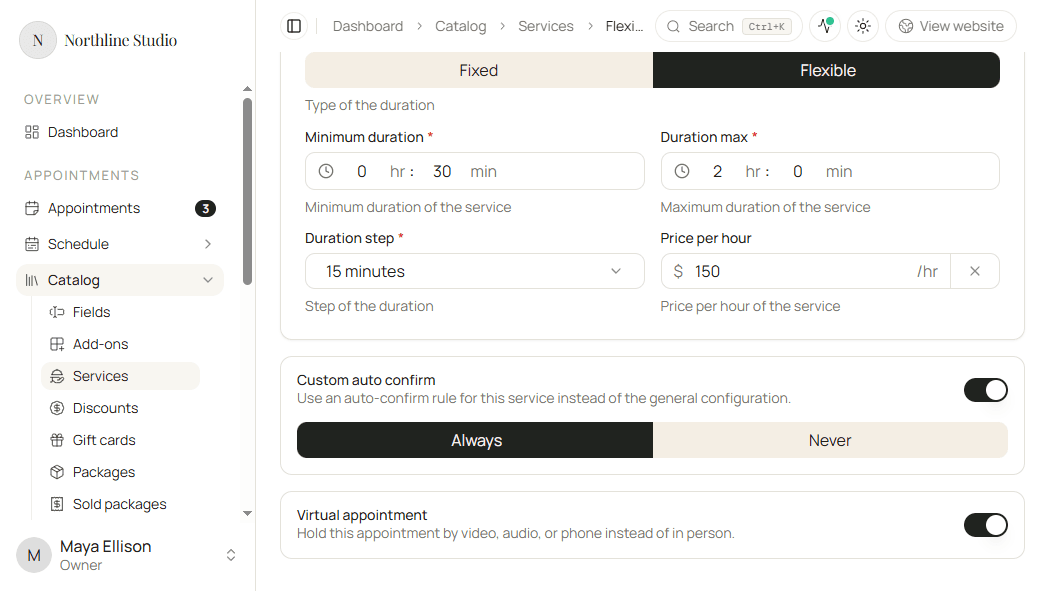
- Set Duration type to Flexible if the client picks a length within a range.
- Set Minimum duration.
- Set Duration max.
- Choose a Duration step (for example 15 minutes or 1 hour).
- Optionally set Price per hour.
Custom auto confirm
By default the service follows your workspace auto-confirm setting.
- Turn on Custom auto confirm to override that for this service only.
- Choose Always (bookings confirm without you) or Never (you must confirm each booking).
Virtual appointment
- Turn on Virtual appointment if this booking is by video, audio, or phone instead of in person.
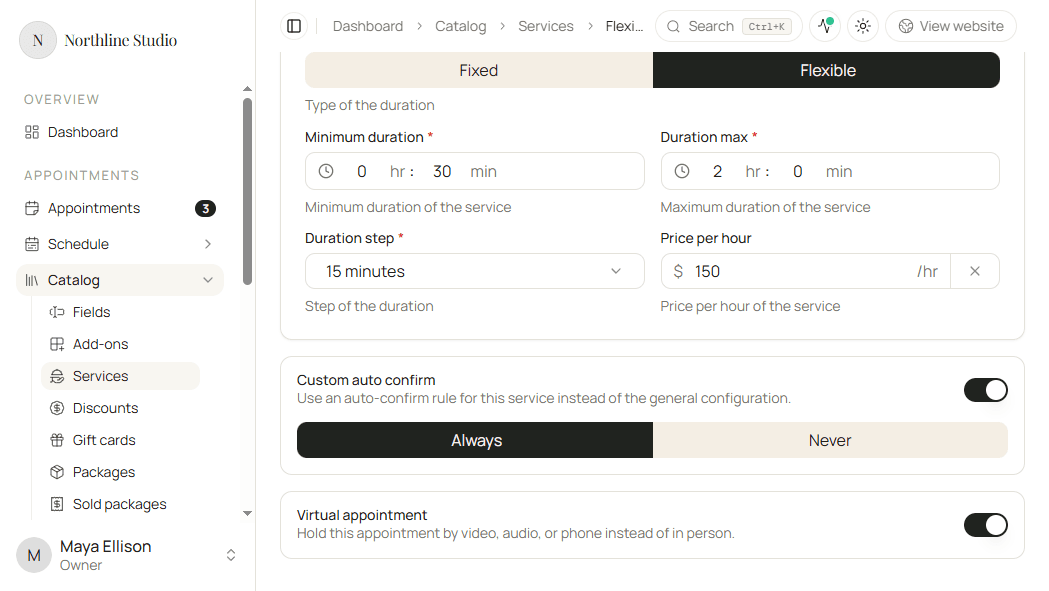
Each member who delivers this service must have a Meeting URL provider configured on their profile (for example Zoom, Google Calendar, or Outlook). Without it, virtual bookings will not get a meeting link.
- For yourself: open Profile from your account menu (
/dashboard/users/me/profile) and set Meeting URL provider. - For another teammate: open Settings → Team, open that member’s profile (
/dashboard/settings/team/<memberId>/profile), and set Meeting URL provider.
Fields
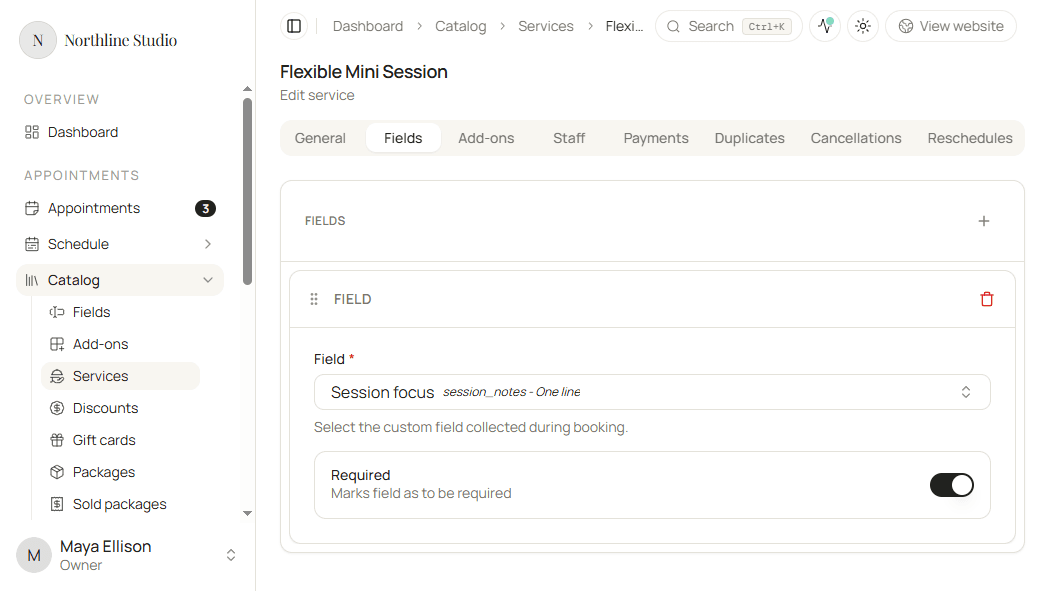
Open the Fields tab to attach questions from Catalog Fields.
- Click + to add a field card.
- Pick a field for each card.
- Optionally turn on Required on the card. If field’s own configuration marks it as required, field will be required regardless of service’s field requirement.
- Drag cards to set the order clients see.
- Remove a card when that question should not appear on this service.
Create fields under Catalog → Fields if you need a new question.
Add-ons
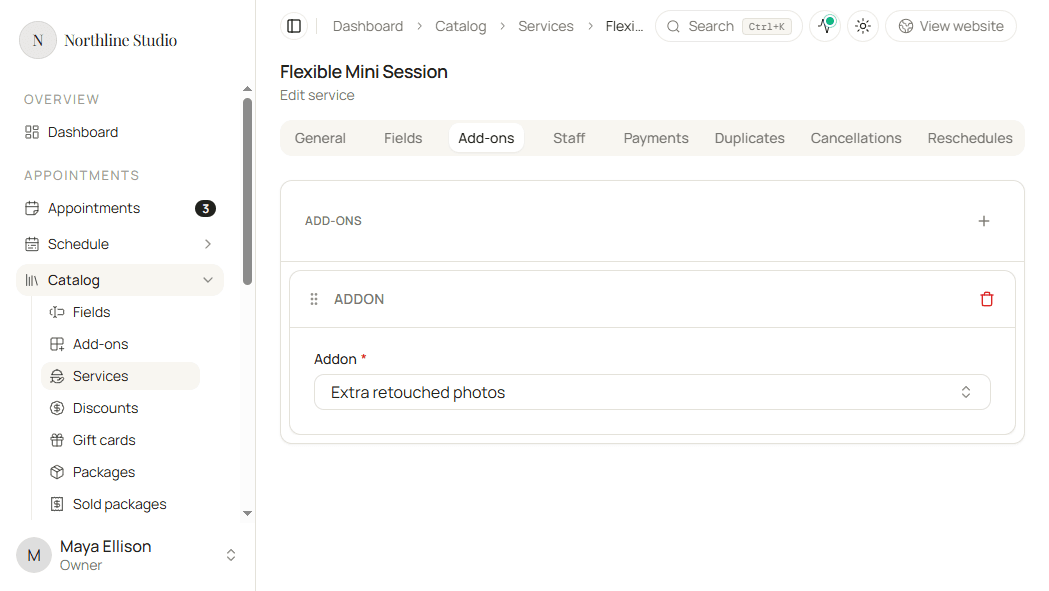
Open the Add-ons tab to offer extras during booking.
- Click + to add an add-on card and pick an add-on.
- Drag cards to set the order.
- Remove a card when that extra should not appear on this service.
Create add-ons under Catalog → Add-ons if you need a new extra.
Staff
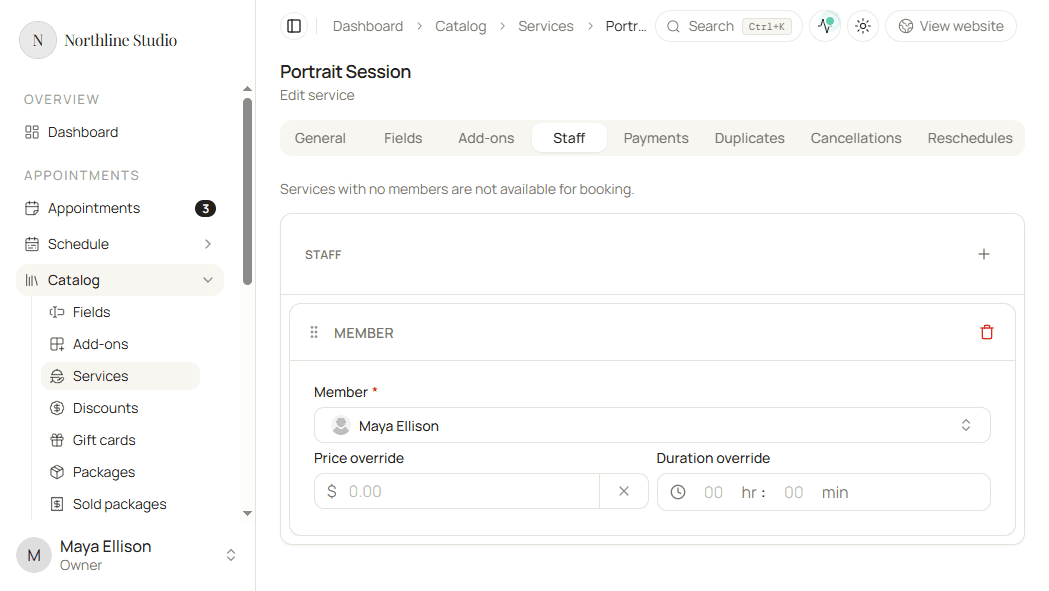
Open the Staff tab to choose who can deliver the service. Services with no members are not available for booking.
- Add a member card and pick a Member.
- Add another card when more than one person can offer the service.
- Optionally set a Price override for that member.
- For Fixed duration, optionally set a Duration override. Flexible services do not use a duration override per member.
- Drag cards to set the order. Remove a card when that member should not offer this service.
Good to know
You need at least two team members in the workspace before you can assign more than one person on this tab.
Payments
Open the Payments tab for deposit and tip rules that apply only to this service. Leave the switches off to follow your workspace defaults under appointment settings.
Custom deposit requirement
Turn on Custom deposit requirement when this service should not use the workspace deposit rule.
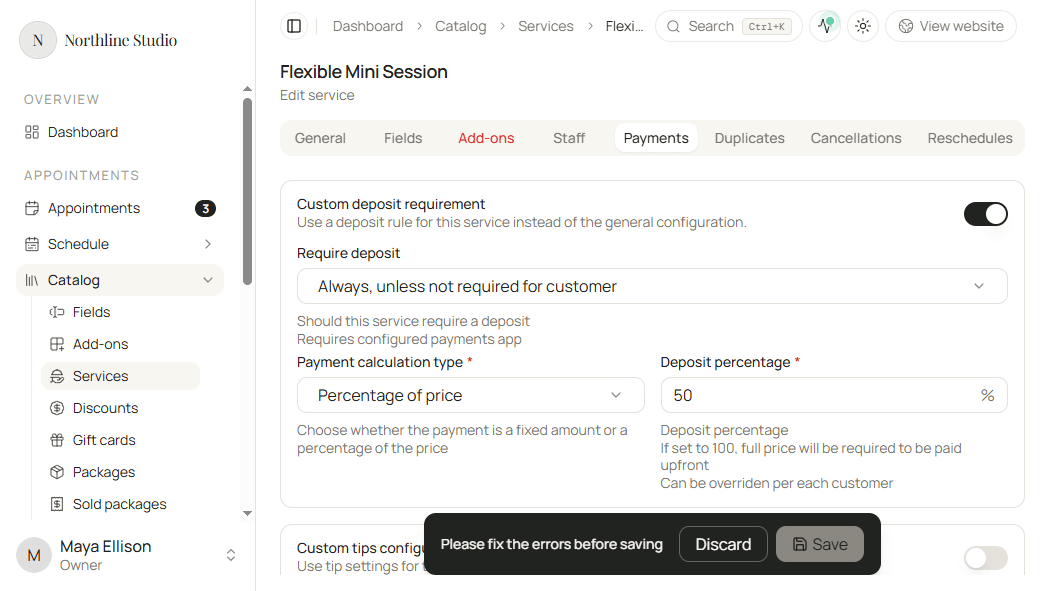
Require deposit
| Option | What it does | When to use it |
|---|---|---|
| Always, unless not required for customer | Clients must pay a deposit for this service, except customers you marked as not requiring a deposit. | High-demand or high-value services where you want commitment up front. |
| Never, unless required for customer | This service skips deposits by default, except customers you marked as requiring a deposit. | Intro or free consults, or services you want to book without payment friction. |
A payments app must be configured for deposits to collect online.
Payment calculation type
| Type | What it does | Why use it |
|---|---|---|
| Percentage of price | Deposit is a percent of the appointment total (for example 50%). Scales with add-ons and duration. | Most services: one rule covers every price point. Set 100 to collect the full price up front. |
| Fixed amount | Deposit is a set currency amount. Hacado never charges more than the final price. | Simple flat holds (for example $50) when prices vary a lot or you want a predictable hold. |
Customer-level deposit overrides can still change what that person pays.
Custom tips configuration
Turn on Custom tips configuration to override workspace tip settings for this service only.
- Set Tips during booking to On, Off, or Only for full payments.
- When tips are on, edit Tip presets (up to four percentage options). Drag to reorder.
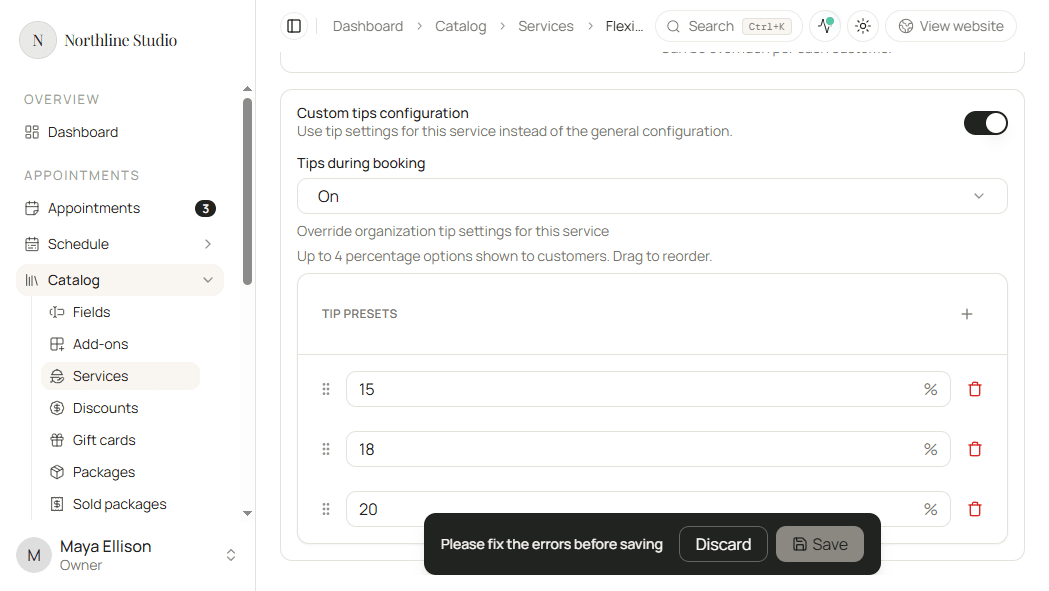
Clients see tip presets on the booking payment form when they pay for the appointment (or the remaining balance). Tips are not shown when tips are Off, and with Only for full payments they appear only when the client is paying the full amount rather than a deposit alone.
Duplicates
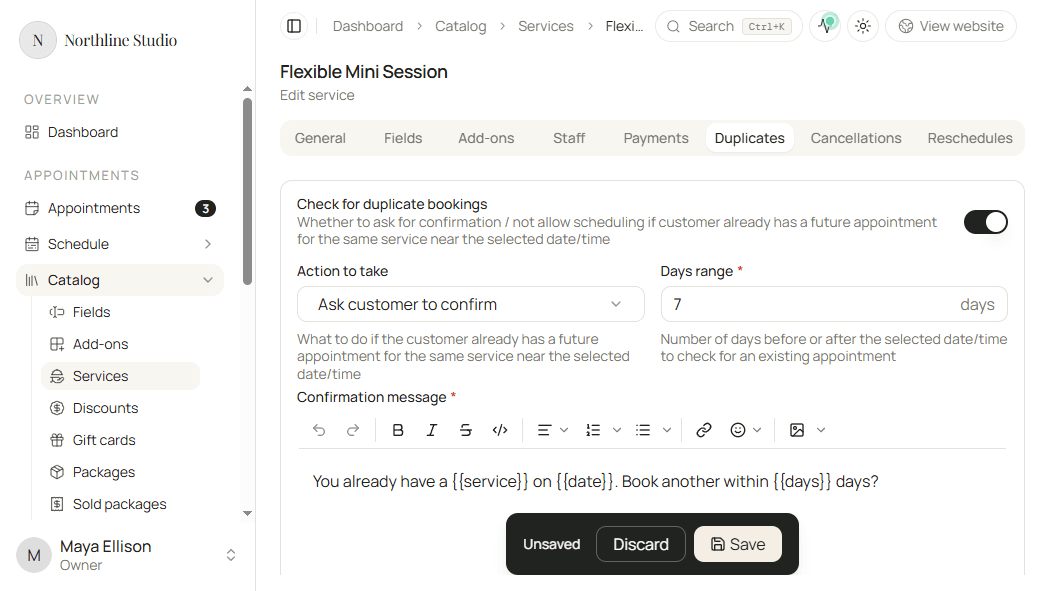
Open the Duplicates tab to warn or block when a client already has a nearby booking for the same service.
- Turn on Check for duplicate bookings.
- Choose Action to take.
- Set Days range.
- Write the Confirmation message (used when the action asks the client to confirm).
Action to take
| Action | What happens |
|---|---|
| Ask customer to confirm | Booking continues after the client acknowledges the message. Use when a second nearby visit is sometimes fine (touch-ups, series). |
| Do not allow scheduling | Booking stops for that slot. Use when two appointments for this service close together should never happen. |
Days range example
Days range looks before and after the date/time the client is trying to book.
Example: Days range is 7, and Alex already has a Portrait Session on Monday 10 Nov.
- Booking another Portrait Session on Thursday 13 Nov (3 days later) triggers the check.
- Booking on Wednesday 19 Nov (9 days later) does not.
The same window applies in the past direction: an existing booking 5 days earlier also counts.
Confirmation message
Shown when the action is Ask customer to confirm. Placeholders:
{{days}}- days range{{name}}- customer name{{service}}- service name{{date}}- date of the existing appointment
What clients see
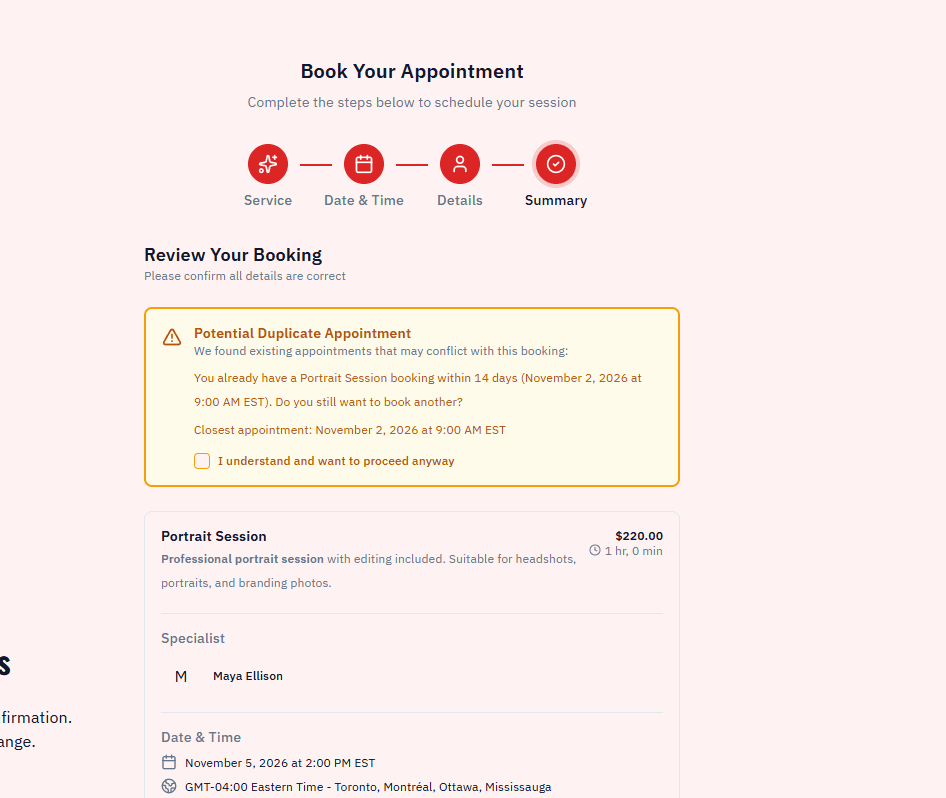
On the booking Summary step, when a nearby booking already exists for the same service, clients see a Potential Duplicate Appointment warning with your confirmation message and the closest appointment time.
When the action is Ask customer to confirm, they must check I understand and want to proceed anyway before Confirm Booking is enabled. When the action is Do not allow scheduling, booking stops instead of offering that checkbox.
Cancellations
Open the Cancellations tab when this service needs different client cancellation rules than your workspace defaults.
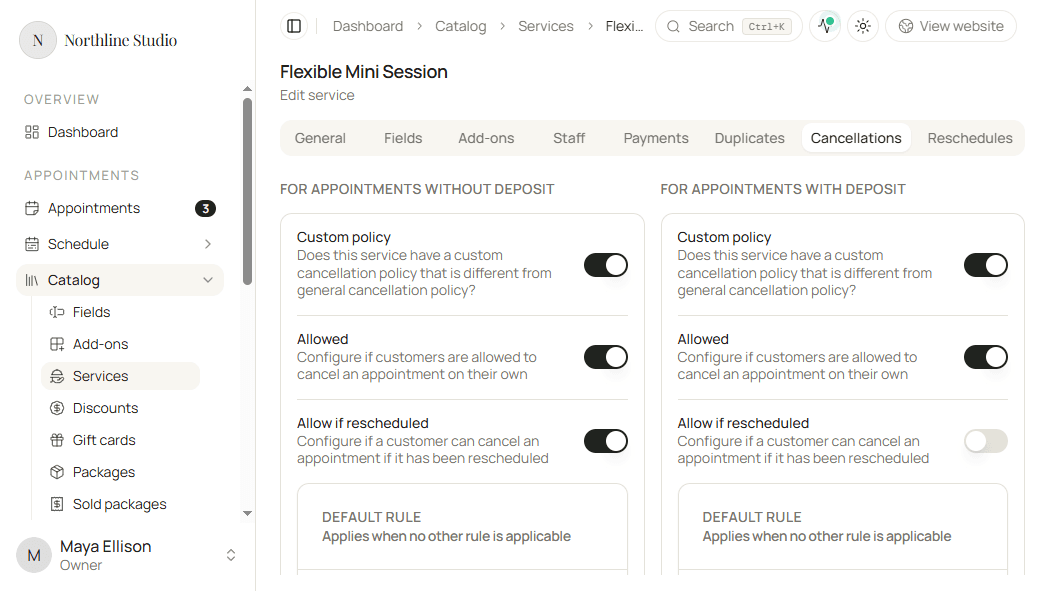
The tab has two columns that apply based on whether that appointment required a deposit:
| Column | Applies when |
|---|---|
| For appointments without deposit | The booking did not collect a deposit. |
| For appointments with deposit | The booking collected a deposit. |
Configure each column separately. A service can allow free cancellation without a deposit while being stricter when a deposit was paid.
Toggles (each column)
- Custom policy - On: this column uses the rules below instead of the workspace cancellation policy. Off: inherit the general configuration for that deposit case.
- Allowed - On: clients may cancel themselves under these rules. Off: clients cannot cancel online for this case (you cancel for them if needed).
- Allow if rescheduled - On: a client may still cancel even if the appointment was rescheduled earlier. Off: once the appointment has been rescheduled, the client cannot cancel it online. Use Off when you want to stop cancel-after-reschedule patterns.
Default Rule vs Override Rules
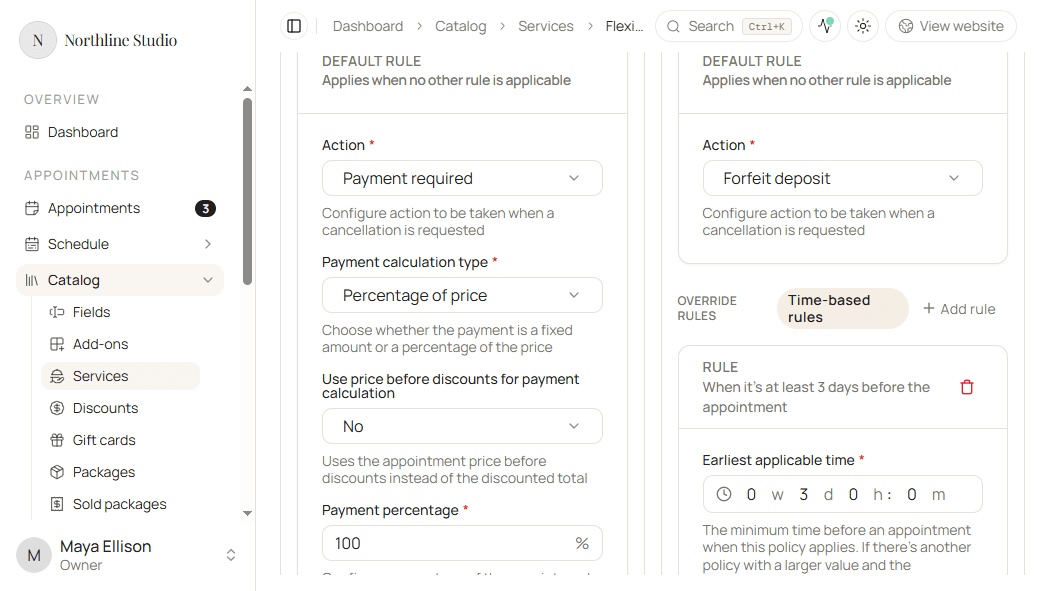
- Default Rule - Used when no override matches. Typically the strictest case (for example when the appointment is soon).
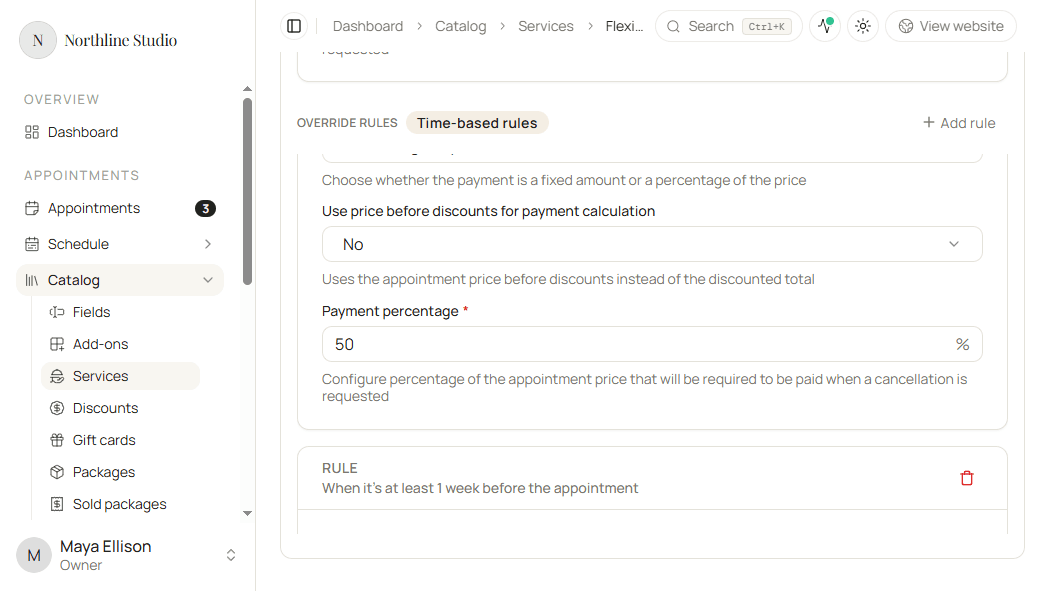
- Override Rules - Time-based rows with Earliest applicable time. Hacado picks the matching override with the largest earliest time that is still less than or equal to how far away the appointment is. If none match (appointment closer than every override), the Default Rule applies.
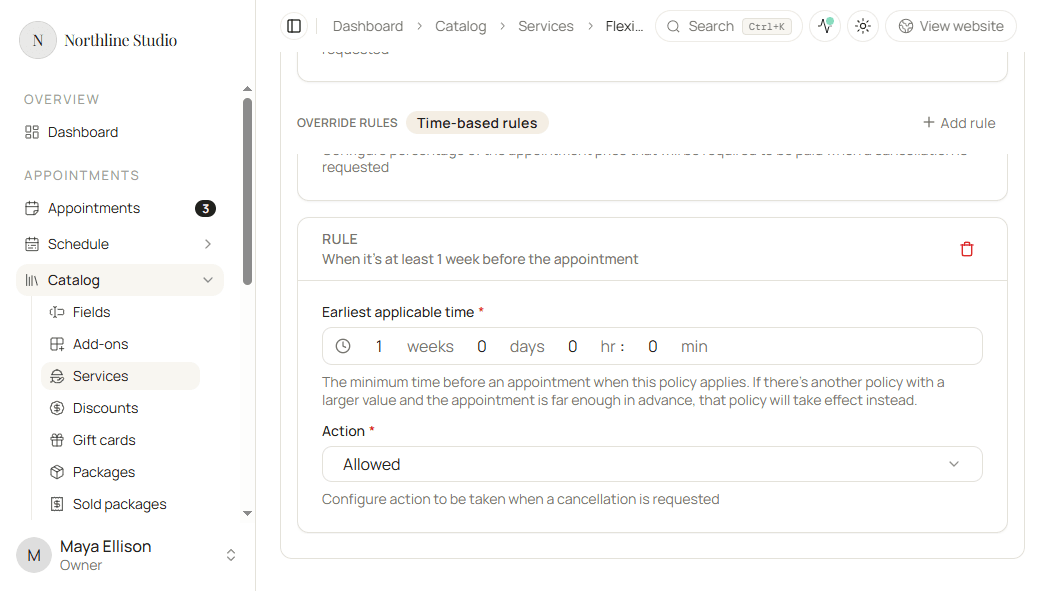
Actions (without deposit)
| Action | Effect |
|---|---|
| Not allowed | Client cannot cancel in this window. |
| Allowed | Cancel free. |
| Payment required | Client must pay a fee (Percentage of price or Fixed amount) to cancel. |
Actions (with deposit)
| Action | Effect |
|---|---|
| Not allowed | Client cannot cancel in this window. |
| Forfeit deposit | Cancel allowed; deposit is kept. |
| Partial refund | Cancel allowed; refund a percent of the deposit (optional Refund fees). |
| Full refund | Cancel allowed; deposit returned. |
| Payment required | Extra payment needed to cancel (Percentage or Fixed amount). |
| Payment to full price required | Client pays the remaining balance up to the full appointment price to cancel. |
Optional: Use price before discounts for payment calculation bases percentage fees on the pre-discount price.
Example: 100% / 50% / free by how soon the appointment is
Goal for appointments without deposit:
- Less than 3 days before the appointment → client pays 100% of the price to cancel.
- At least 3 days and less than 7 days → pay 50%.
- 7 days or more → cancel free.
Build it on For appointments without deposit:
- Turn on Custom policy and Allowed.
- Default Rule (closest appointments): Action = Payment required, Percentage of price, Payment percentage = 100.
- Add rule - Earliest applicable time = 3 days, Payment required, 50%.
- Add rule - Earliest applicable time = 7 days, Action = Allowed.
How Hacado applies it:
| Time until appointment | Rule used | Result |
|---|---|---|
| 2 days | Default (no override matches) | Pay 100% |
| 5 days | 3-day override | Pay 50% |
| 10 days | 7-day override | Free |
Mirror the same idea under For appointments with deposit with deposit actions (for example Forfeit deposit close in, Full refund further out).
Reschedules
Open the Reschedules tab for client reschedule rules that differ from workspace defaults.
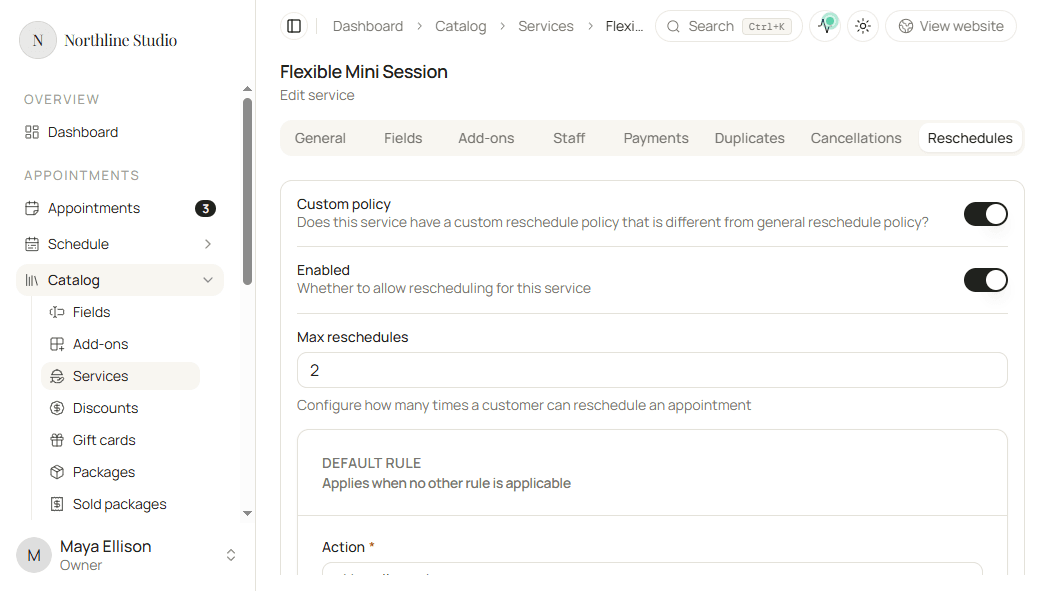
- Turn on Custom policy.
- Turn on Enabled so clients may reschedule under these rules.
- Optionally set Max reschedules (for example 2) - after that count, further reschedules are blocked.
- Set the Default Rule and any Override Rules the same way as cancellations (earliest applicable time + action).
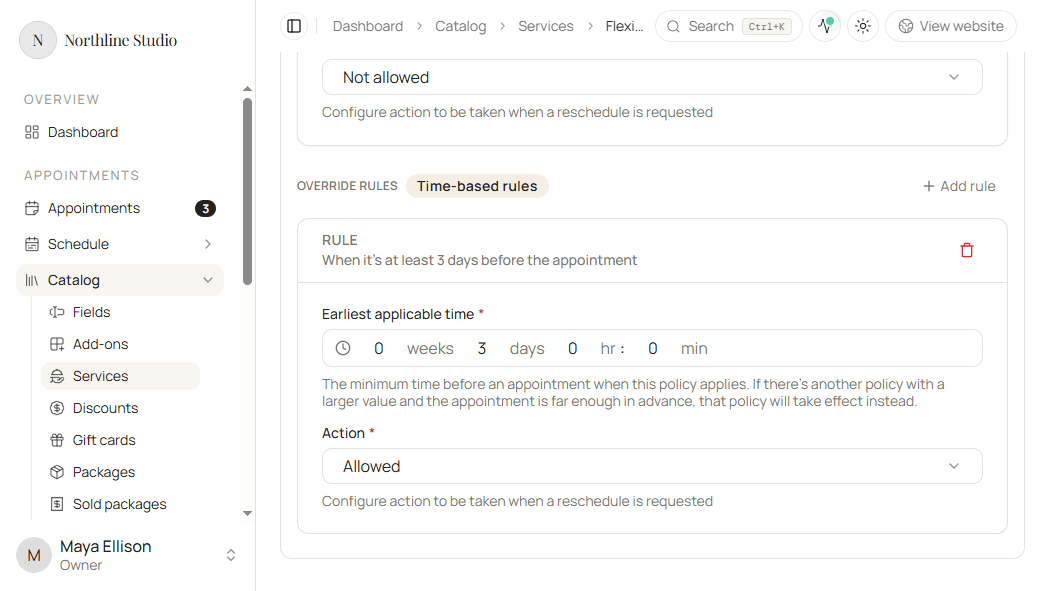
Reschedule actions
| Action | Effect |
|---|---|
| Not allowed | Client cannot reschedule in this window. |
| Allowed | Reschedule free. |
| Payment required | Fee to reschedule (Percentage or Fixed amount). |
Example: Default Rule = Not allowed, override at 3 days = Allowed → clients can move the booking when it is at least 3 days away; inside the last 3 days they cannot reschedule online.
Save and booking availability
- Click Save.
Saving creates the service in Catalog. It does not put the service on your booking page by itself. Clients can book it only after it is listed under Settings → Appointments → Services and packages.
Right after create, Hacado asks Add this service to booking availability?
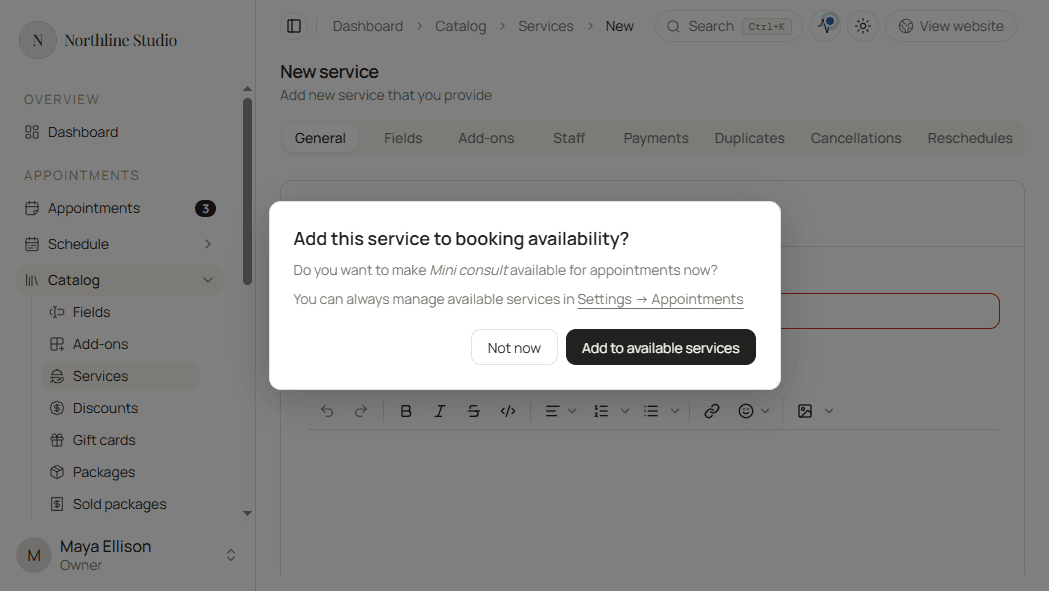
- Click Add to available services to make it bookable now, or Not now to leave it in Catalog only.
You can change availability later under Services and packages.
Good to know
- A first-time overview is also in Set up your services.
- After Not now or Add to available services, Hacado opens the saved service so you can keep editing.